Platform security
End-client/User creation
- Registration/Compliance enabled
In the process of creating a user, and also when a new user is invited from the 'Team' section, personal information is required from the user following the registration process. Beyond the strictly personal data, the following are mandatory fields:
- Email and phone number:
This data is used to verify, in the first step, the applicant user. In this sub-sequential flow, an email is sent to the email recipient with a link to define the credentials. This method ensures the email registered exists.
Once the invitation process is done by a Director or an Account owner, the invited user will receive an email to join the SME or CONSUMER platform. The email received will contain the following information:
- _Welcome to [Name]. [Name] has invited you to join the company [Company Name] in [Name]. Click here or follow the link below to set up your credentials and start using [Name]._
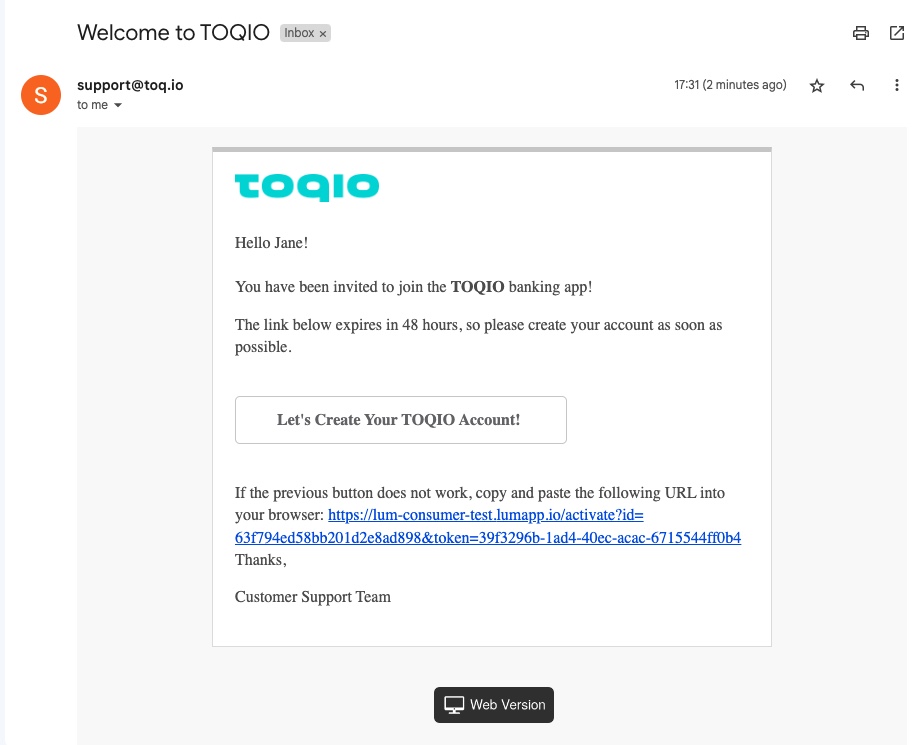
The link is secured with a 48-hour valid token. Once the link expires, you will not be able to set up credentials by following that link and will need to be re-invited from the Admin portal.
Once you successfully reach the set-credentials screen, the following information is required:
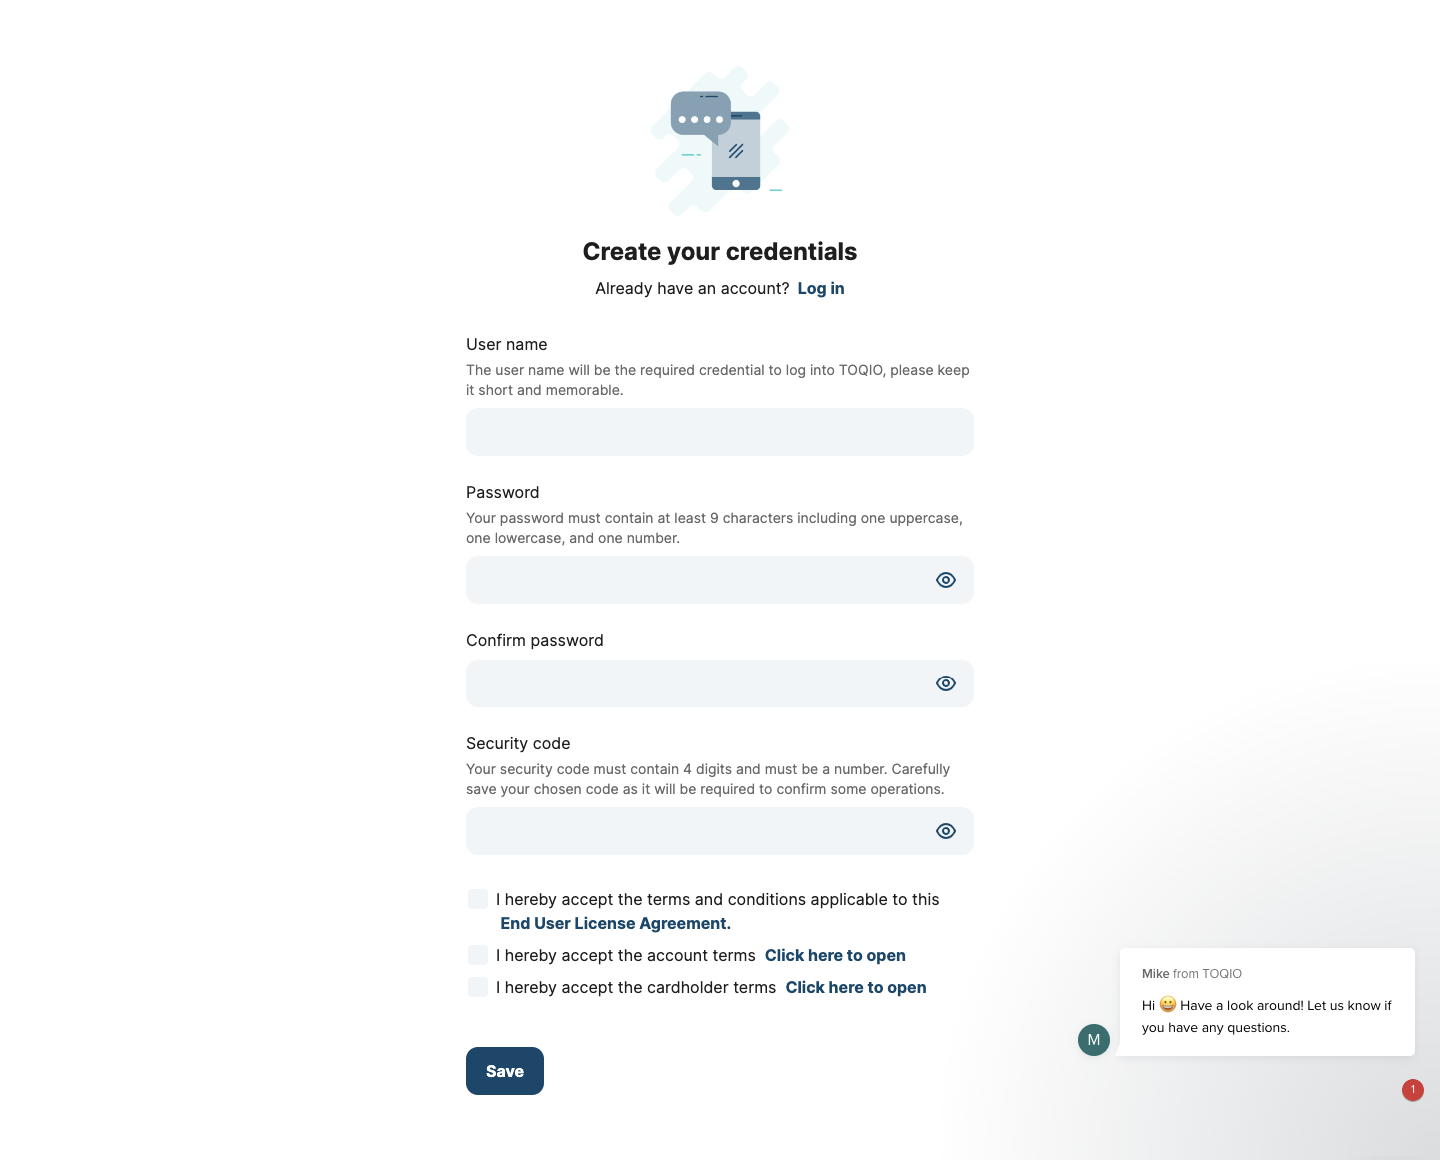
| User name (mandatory) | Password (mandatory) | Confirm password (mandatory) | Security code (mandatory) |
|---|---|---|---|
| Warning shown above field: The user name will be the required credential to log into Toqio, please keep it short and memorable. | A warning is shown above field: Your password must contain at least 9 characters, including one uppercase letter, one lowercase letter, and one number. The Password Policy& Error are flexible and can be tailored to meet your business needs. Our Delivery team will handle the configuration internally | Match validation: if the password doesn't match, an error message will show: Passwords don't match. | A warning is shown above the field: Your security code must contain 4 digits and must be a number. Carefully save your chosen code as it will be required to confirm some operations. |
| Validation: between 3 and 32 characters including any number, lower case or upper case letters, dot, dash, or underscore | Security validation: if the password does not meet the requirements, an error message will show: At last 9 characters including one uppercase, one lowercase, and one number. | Requirements validation: if the code is shorter or longer than 4 digits, an error will show: Security code must have 4 digits. | |
| By default passwords must adhere to the following regular expression: ^(?=.[a-z])(?=.[A-Z])(?=.\d)[\w~@#$%^&+=`|{}:;!.?\"()\[\]-]{9,}$ The Password Policy& Error are flexible and can be tailored to meet your business needs. Our Delivery team will handle the configuration internally | Exception!: Modulr users will need to set up security questions as SCA requirements to continue the process related to the card payment process; where a user will be asked randomly, based on the fraud algorithm, to answer said questions during card payments. | ||
| End-user passwords are hashed using the BCrypt strong hashing function (not reversible) and stored in MongoDB. |
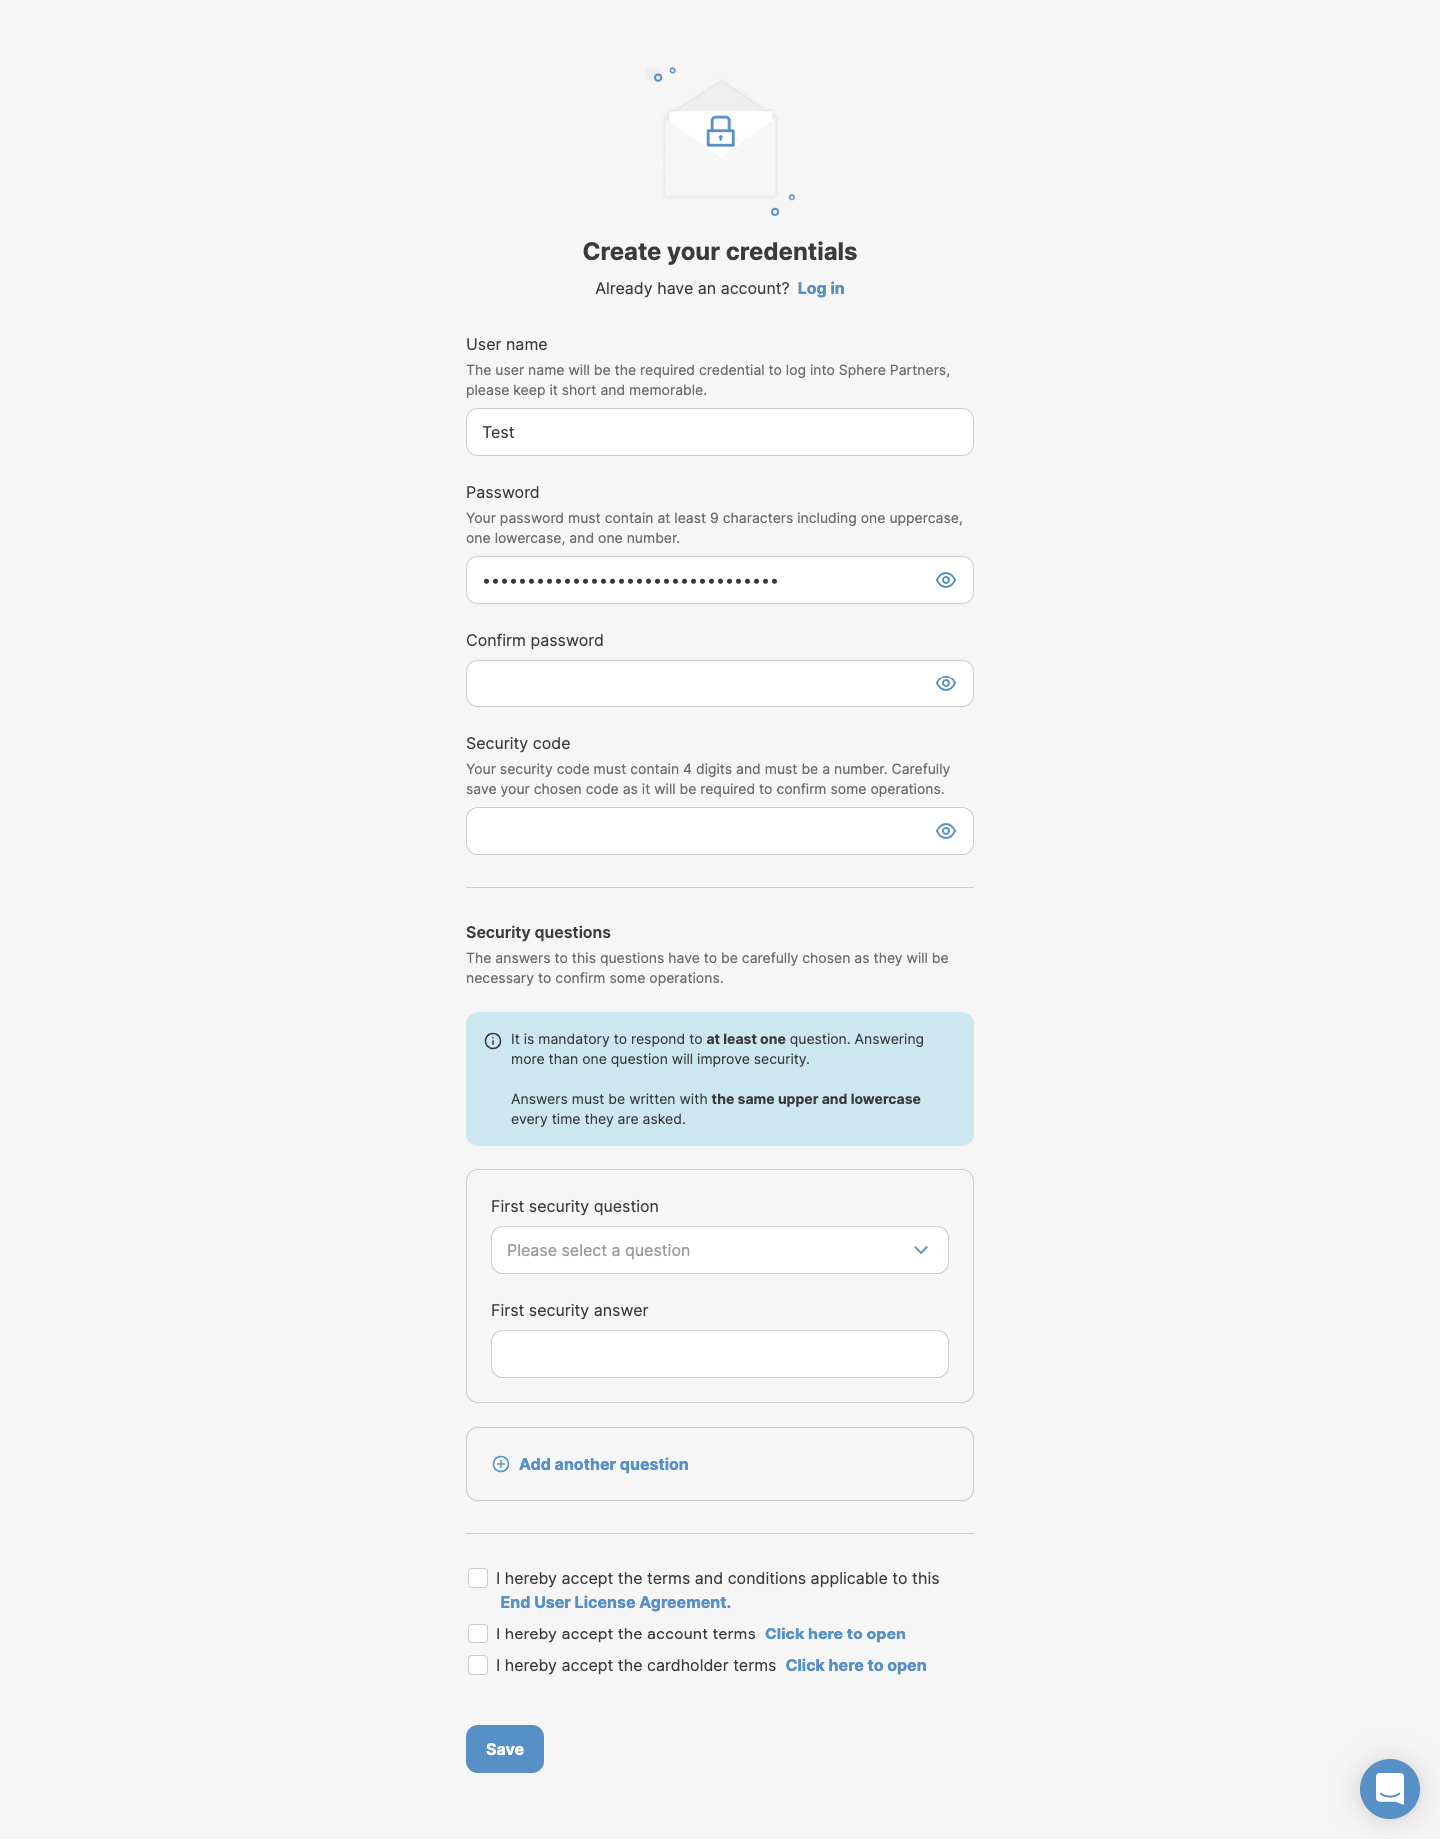
| The security questions module will contain the following information: |
|---|
| Warning shown above field: The answer to these questions have to be carefully chosen as they will be necessary to confirm some operations. |
| Highlighted warning: It is mandatory to respond to at least one question. Answering more than one question will improve security. Answers must be written in the same upper and lowercase every time they are asked. |
| Users will have the option to answer from 1 to 5 questions from the dropdown. |
| Each answer will have a validation of characters, from 1 to 45 Latin characters. |
| Questions can be added or deleted. However, at least one must be answered. |
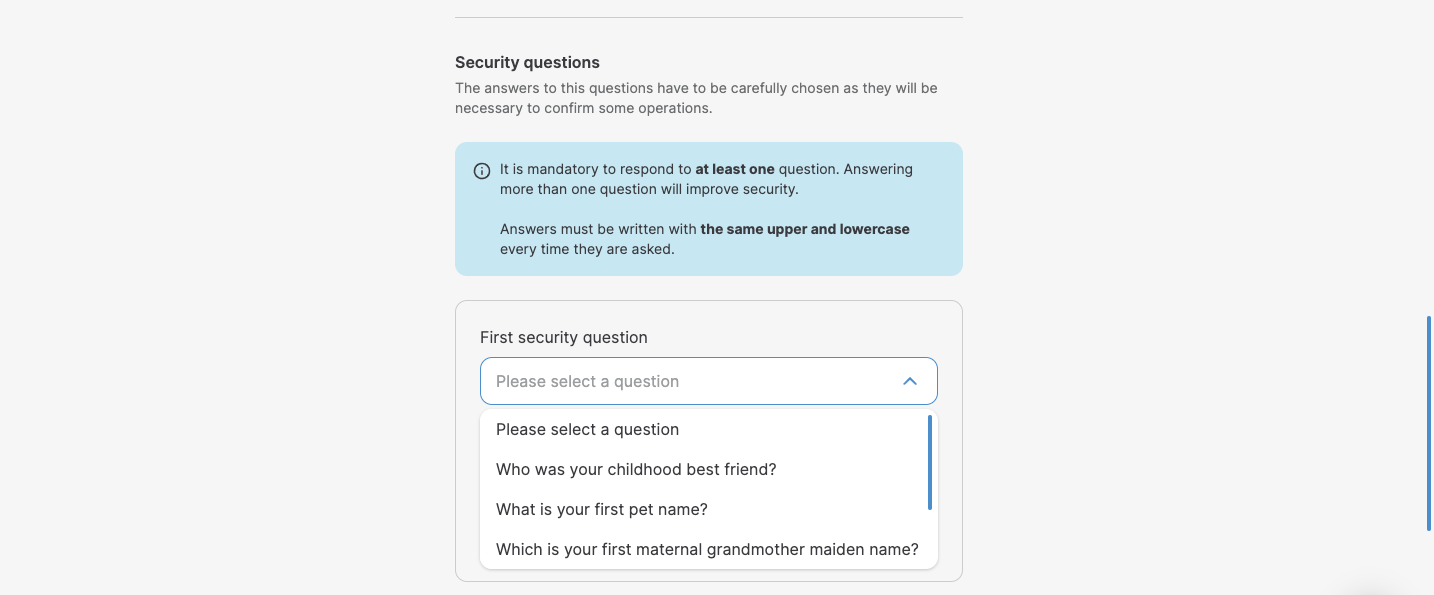
| Applies to the entirety of the form: |
|---|
| Empty fields will show an error message: Field is required. |
| If no fields are fulfilled the 'Save' button will show an error requiring all the missing data. |
| Terms and Conditions must also be selected to be able to continue onto the Onboarding process. - Each checkbox will contain the corresponding document to be consulted. |
| The link included in the email will expire after 48 hours for security reasons. |
As a final step, you will be required to confirm the phone number that was provided during the registration or invitation process. To run this validation we use OTP implementation, you will be required to add the 4-digit code sent to the provided phone number. This phone number will be used from this point forward as a secure device to validate key operations. The phone number will also be blocked from editing forms and can only be updated in the Admin portal under request and admin user confirmation.
Registration/Compliance disabled
Find more information in Managing your clients.
Blacklists
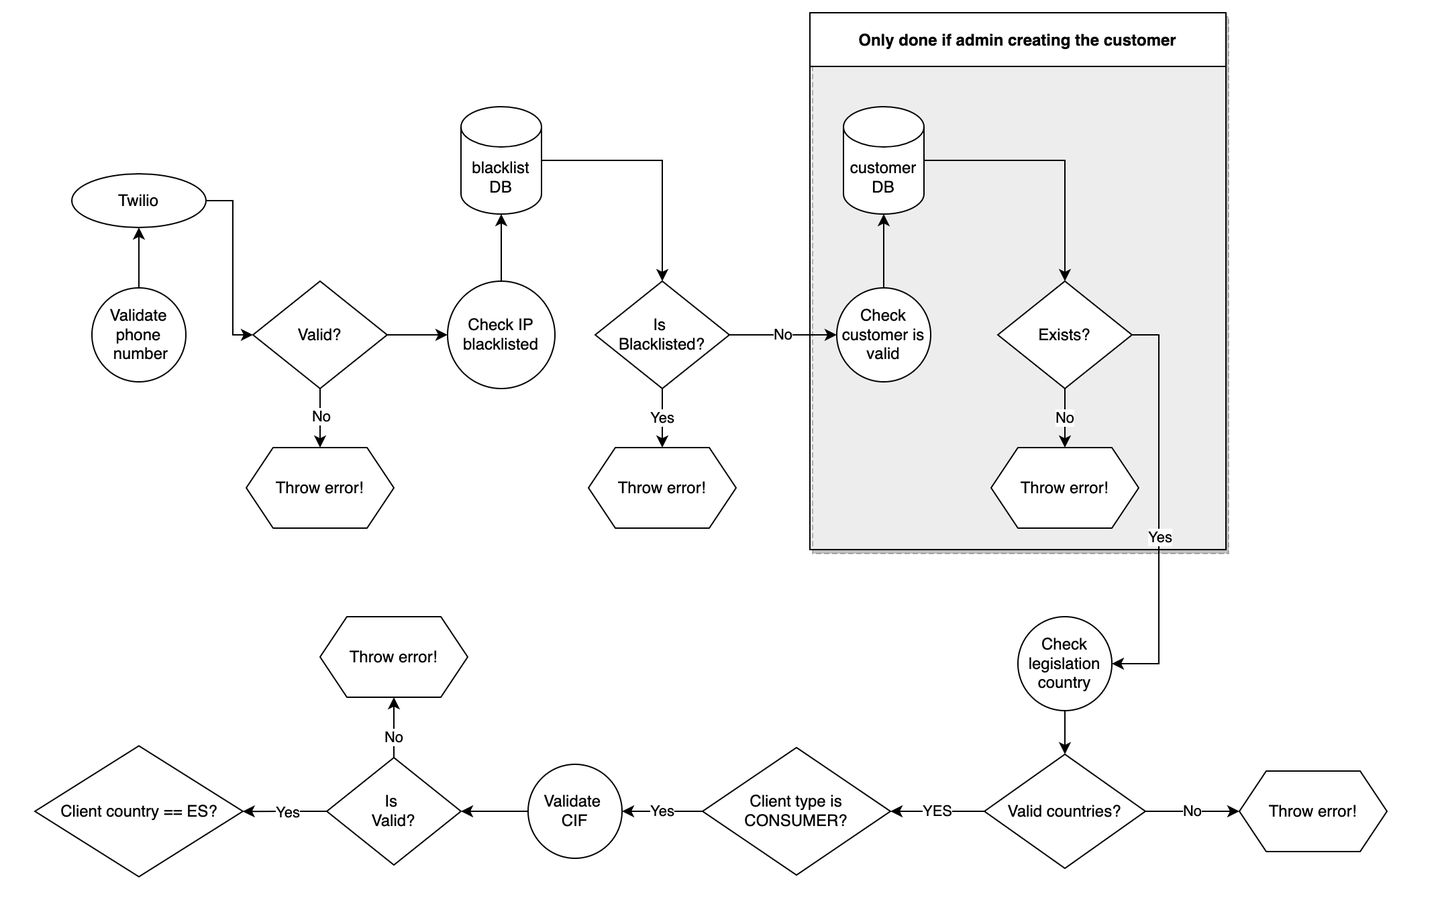
When fraudulent use of the platform is detected by a client, by creating a ticket to Toqio's internal support team, we can blacklist both the phone number and the IP address. Therefore, checks on these parameters are run while creating a new user. A partial flow of the client registration process where Toqio's system checks blacklisted records:
OTP
Toqio is integrated with Twilio services to validate the phone number registered as a secure device. The current implementation permits clients to choose the delivery method of these messages:
- SMS or WhatsApp
This selection is a general configuration, not client or region based, so if the client selects SMS all the OTPs will be sent through that channel.
| Summary of the steps where OTP is required: |
|---|
| User creation |
| Forgotten password reset |
| Beneficiary creation |
| Beneficiary edition |
| New team member creation |
| Team member edition |
Automatic expirations of the session
For security reasons, there are some automatic session expirations in the platform.
| Web portal: the session expires after 15 minutes of inactivity. This is a well-balanced approach to keeping a secure environment without interfering with a regular user flow. | When a user is logged in to the platform and is trying to update the security code or the password in the 'User settings' section, an automatic log out will be executed after 3 unsuccessful tries, considering the user is trying to impersonate the real user. |
Password update for logged-in users
The password is created by the user on the 'set up credentials' step. Beyond the password setup and its variations, there are other sections where the password can be managed:
- Forgot password: located on the login screen, the user can find a link to a form for forgotten password reset
- Username is required
- If all the information is correct, the user will receive a 6-digit OTP in the registered phone number
- Once the OTP is validated, the user will be required to add a new password

- Reset password: a user logged in can reset the password by accessing the user settings section
- Old password:
- On error, the user will see a generic error such as: Try it again, please. On success, the user won't see any specific message.
- If no password is entered yet: Field is required
- New password:
- Validation: At least 9 characters including one uppercase, one lowercase, and one number
- If no password is entered yet: Field is required
- Repeat the new password:
- Validation within new password: Passwords don't match
- If no password is entered yet: Field is required
- If the password has been changed successfully, the user will be shown a message: Data has been saved successfully
- Old password:
Security code management:
Security code update
A security code for a logged-in user can be updated in the 'User settings' section. The form presented to the user will require the following flow:
| Old code - Error |
|---|
| The user will be shown an error warning stating that they have 2 more tries. |
| The user will see a back option that by selecting it, will go to the 'User setting' option list. |
| The user will now have only 2 options available to change the code. When the user adds the correct code, the tries will go back to 3. |
| After trying 3 times and getting an error, the user will be logged out of the app. |
| Old code - Success |
|---|
| The user will need to add a new 4-number code. After adding the code, the user will be shown the same screen again, to repeat the code. |
| New code - Validations |
|---|
| If Latin characters are included: Code must contain only numbers |
| If more than 4 digits are included: Code must have 4 numbers |
| Repeat new code |
|---|
| Validation within new code: Codes don't match |
If the code has been changed successfully, the user will be shown a confirmation screen.
If the code has not been changed successfully, the user will be shown the same screen to try again or to go back. Confirming the code doesn't have a limit of tries. If they go back, the process can be started again with the old code.
Security code required
There are a few actions that must be confirmed by adding the security code. These are the following:
- Make a Payment
- Issue a new card
- View card PIN
- Block the card
- Cancel the card
- Modify card limits
- View card details
Roles and permissions:
The platform is based on permissions. This way there is control over what a user can access depending on the permissions they have assigned.
Permission is assigned to a role, and depending on what features (see Turning admin functions on/off for more information) they have, permissions belonging to a role are kept or removed.
Currently, there are two sets of roles:
| SME roles | |
|---|---|
| ROLE_COMPANY_ADMIN (Director) | This role is the manager of a company (CEO, COO, CFO), They can manage the whole company. |
| ROLE_DIRECTOR (Manager) | This role belongs to the Director of a company. They have access to many features, but more so in a read-only role. They can't, for example, create accounts or make payments. |
| ROLE_EMPLOYEE (Employee) | As its name describes, this role belongs to an employee of a company and will ONLY be able to see their information. |
| ROLE_ACCOUNTANT (Accountant) | This is a special role, it belongs to the accountant of the company. They mostly have read-only permissions. |
| CONSUMER roles | |
|---|---|
| ROLE_OWNER (Account owner) | This role is the owner of a consumer client. |
| ROLE_BENEFICIARY (Cardholder) | This is the role of a beneficiary, a beneficiary will be like an employee role inside a consumer client. |
Permissions
As mentioned previously, each role has a set of permissions, these permissions are what allow the platform to know when to display or not something, to allow access to different endpoints, etc. Here is a table describing some:
SME and CONSUMER clients' table of permissions
| CARDS | Permission | Description | Roles who can have this permission | Features that remove it |
|---|---|---|---|---|
| VIEW_COMPANY_CARDS | This permission allows a user to see all cards belonging to a client | - ROLE_COMPANY_ADMIN - ROLE_DIRECTOR - ROLE_ACCOUNTANT - ROLE_OWNER | Card feature OFF will remove this permission from all roles | |
| VIEW_MY_CARDS | With this permission, a user can view their cards | - ROLE_COMPANY_ADMIN - ROLE_DIRECTOR - ROLE_EMPLOYEE - ROLE_ACCOUNTANT - ROLE_OWNER - ROLE_BENEFICIARY | Card feature OFF will remove this permission from all roles | |
| EDIT_COMPANY_CARDS | With this permission, a user can edit (cancel, freeze, etc.) a card | - ROLE_COMPANY_ADMIN - ROLE_OWNER | Card feature OFF will remove this permission from all roles | |
| ISSUE_COMPANY_CARDS | With this permission, a user can issue cards from the portal | - ROLE_COMPANY_ADMIN | Card feature OFF will remove this permission from all roles |
| EXPENSES | Permission | Description | Roles who can have this permission | Features that remove it |
|---|---|---|---|---|
| VIEW_COMPANY_EXPENSES | This permission allows a user to see all expenses belonging to a client | - ROLE_COMPANY_ADMIN - ROLE_DIRECTOR - ROLE_ACCOUNTANT - ROLE_OWNER | Expense feature OFF will remove this permission from all roles | |
| VIEW_MY_EXPENSES | With this permission, a user can view their expenses | - ROLE_COMPANY_ADMIN - ROLE_DIRECTOR - ROLE_EMPLOYEE - ROLE_ACCOUNTANT - ROLE_OWNER - ROLE_BENEFICIARY | Expense feature OFF will remove this permission from all roles | |
| MANAGE_EXPENSES | With this permission, a user can manage (pay, decline, approve, etc.) an expense | - ROLE_COMPANY_ADMIN | Expense feature OFF will remove this permission from all roles | |
| EDIT_EXPENSES | With this permission, a user can edit the information on an expense | - ROLE_COMPANY_ADMIN - ROLE_DIRECTOR - ROLE_EMPLOYEE - ROLE_OWNER - ROLE_BENEFICIARY | Manual expense feature OFF will remove this permission from all roles | |
| CAN_CREATE_EXPENSE | Allows a user to create a manual expense | - ROLE_COMPANY_ADMIN - ROLE_DIRECTOR - ROLE_EMPLOYEE - ROLE_OWNER - ROLE_BENEFICIARY | Manual expense feature OFF will remove this permission from all roles |
| EMPLOYEE | Permission | Description | Roles who can have this permission | Features that remove it |
|---|---|---|---|---|
| VIEW_EMPLOYEE_LIST | This permission allows a user to see all employees belonging to a client | - ROLE_COMPANY_ADMIN - ROLE_DIRECTOR - ROLE_ACCOUNTANT - ROLE_OWNER | Doesn't belong to an ON/OFF feature | |
| MANAGE_EMPLOYEES | With this permission, a user can manage (create, update, delete, etc.) all users belonging to a client | - ROLE_COMPANY_ADMIN - ROLE_OWNER | Doesn't belong to an ON/OFF feature | |
| EDIT_EMPLOYEE_PROFILE | With this permission, a user can edit an employees profile | - ROLE_COMPANY_ADMIN - ROLE_DIRECTOR - ROLE_OWNER | Doesn’t belong to an ON/OFF feature | |
| ISSUE_COMPANY_CARDS | With this permission, a user can issue cards from the portal | - ROLE_COMPANY_ADMIN - ROLE_OWNER | Card feature OFF will remove this permission from all roles |
| ACCOUNT | Permission | Description | Roles who can have this permission | Features that remove it |
|---|---|---|---|---|
| VIEW_COMPANY_ACCOUNTS | This permission allows a user to see all accounts belonging to a client | - ROLE_COMPANY_ADMIN - ROLE_DIRECTOR - ROLE_ACCOUNTANT - ROLE_OWNER | Doesn’t belong to an ON/OFF feature | |
| VIEW_MANAGE_ACCOUNTS | With this permission, a user can manage various accounts (create, update, cancel/remove and get partner products) | - ROLE_COMPANY_ADMIN ROLE_OWNER | Multi-account feature OFF will remove this permission from all roles | |
| CAN_CREATE_CLIENT_ACCOUNT | With this permission, a user can create an account (single one for when multi-account is OFF) and get partner products | - ROLE_COMPANY_ADMIN - ROLE_OWNER | Doesn’t belong to an ON/OFF feature |
| COMPANY | Permission | Description | Roles that can have this permission | Features that remove it |
|---|---|---|---|---|
| EDIT_COMPANY_SETTINGS | This permission allows a user to get/update company data and settings | - ROLE_COMPANY_ADMIN - ROLE_OWNER | Doesn’t belong to an ON/OFF feature |
| ACCOUNTING | Permission | Description | Roles who can have this permission | Features that remove it |
|---|---|---|---|---|
| MANAGE_THIRD_PARTIES | With this permission, a user can manage the Accounting section in the platform and connect to a third party or download/manage reports | - ROLE_COMPANY_ADMIN - ROLE_DIRECTOR - ROLE_ACCOUNTANT - ROLE _OWNER | Doesn’t belong to an ON/OFF feature | |
| CAN_EXPORT_TRANSACTIONS | With this permission, a web portal user is able to Export transaction statements of all their Inbound and Outbound transactions. | - ROLE_COMPANY_ADMIN - ROLE_DIRECTOR - ROLE_ACCOUNTANT - ROLE_OWNER | The Feature Can See Export will deactivate this from the web sidebar |
| PAYMENTS | Permission | Description | Roles who can have this permission | Features that remove it |
|---|---|---|---|---|
| CAN_CREATE_PAYEE | Allow a user to see the “Create payee” button in the FE and allow creation/update/deletion of beneficiaries in the back end | - ROLE_COMPANY_ADMIN - ROLE_OWNER | Doesn’t belong to an ON/OFF feature | |
| ISSUE_PAYMENT | With this permission, a user can issue a new payment | - ROLE_COMPANY_ADMIN - ROLE_OWNER | Doesn’t belong to an ON/OFF feature | |
| ISSUE_TRANSFER | - ROLE_COMPANY_ADMIN - ROLE_OWNER | Doesn’t belong to an ON/OFF feature | ||
| CAN_MANAGE_FX_TX | With this permission, a user can issue a new FX payment (payments between different currencies) | - ROLE_COMPANY_ADMIN - ROLE_OWNER | FX payments feature OFF will remove this permission from all roles |
| AI AND REVERSE FACTORING | Permission | Description | Roles who can have this permission | Features that remove it |
|---|---|---|---|---|
| This permission is only for SME | CAN_MANAGE_ADVANCED_INVOICING | This permission allows a user to view and have access to all Advanced Invoicing functionality | - ROLE_COMPANY_ADMIN - ROLE_DIRECTOR | Advanced invoicing feature OFF will remove this permission from all roles |
| This permission is only for SME | CAN_MANAGE_REVERSE_FACTORING | This permission allows a user to view and have access to all Reverse Factoring functionality | - ROLE_COMPANY_ADMIN - ROLE_DIRECTOR | Reverse factoring feature OFF will remove this permission from all roles |
| BILLING | Permission | Description | Roles who can have this permission | Features that remove it |
|---|---|---|---|---|
| These permissions are only for SME and CONSUMER roles with rights to make payments, create users, issue cards and create new accounts | CAN_VIEW_FEES | With this permission, a user can view fees related to account/payment/cards/user creation | - ROLE_COMPANY_ADMIN - ROLE_OWNER | Billing feature OFF will remove this permission from all roles |
Updated about 1 year ago
